
With our cellphones holding more of our personal info than ever, it’s important to keep all of it, including your photos and documents, away from prying eyes. Joseph from Fort Myers, Florida, reached out with a concern many of us share. He’s asking how to keep his photos and documents hidden on his iPhone.
“I am looking for a secure way to store personal information on my iPhone, numbers, passwords, documents, pictures – like insurance cards and photos. Do I need an app? If so, what do you recommend?” — Joseph, Fort Myers, Florida
That is an important question as keeping data private is getting harder and harder to do well, but fortunately your iPhone has some built-in features that will help you with this. Plus, there are some well-known and trusted solutions that you might also want to consider making sure your private data remains just that – private.
CLICK TO GET KURT’S FREE CYBERGUY NEWSLETTER WITH SECURITY ALERTS, QUICK VIDEO TIPS, TECH REVIEWS AND EASY HOW-TO’S TO MAKE YOU SMARTER
A person typing on iPhone (Kurt "CyberGuy" Knutsson)
Step 1: Set up a strong passcode and enable Face ID or Touch ID
Your iPhone’s passcode and Face ID are the gatekeepers of your data. So you’ll want to set up these to ensure that others cannot access your iPhone beyond the lock screen. Here’s how to make them impenetrable.
Set a strong passcode
- Go to Settings
- Scroll down and tap Face ID & Passcode
- Tap ‘Turn Passcode On’
- Choose a passcode that’s hard to guess
Remember to change your passcode periodically to maintain security.
Enable Face ID or Touch ID
- Unlock your iPhone and go to the Settings app
- Scroll down and tap on Face ID & Passcode
- If prompted, enter your device passcode to continue
- Tap Set Up Face ID
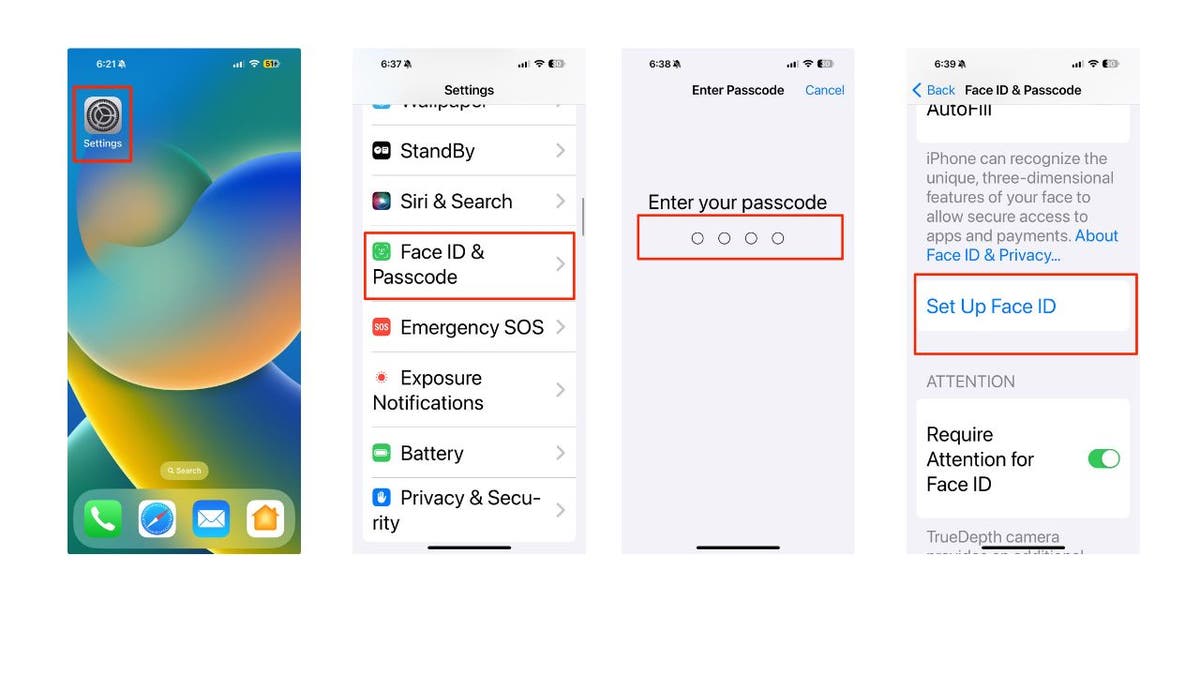
Steps to enable Face ID or Touch ID (Kurt "CyberGuy" Knutsson)
- Tap Get Started
- Then you will be asked to position your face within the frame so that your iPhone’s TrueDepth camera can capture your facial features and create a unique Face ID profile.
- Tap Done after your Face ID is set up
- This profile will be used for secure authentication and unlocking your device using facial recognition.
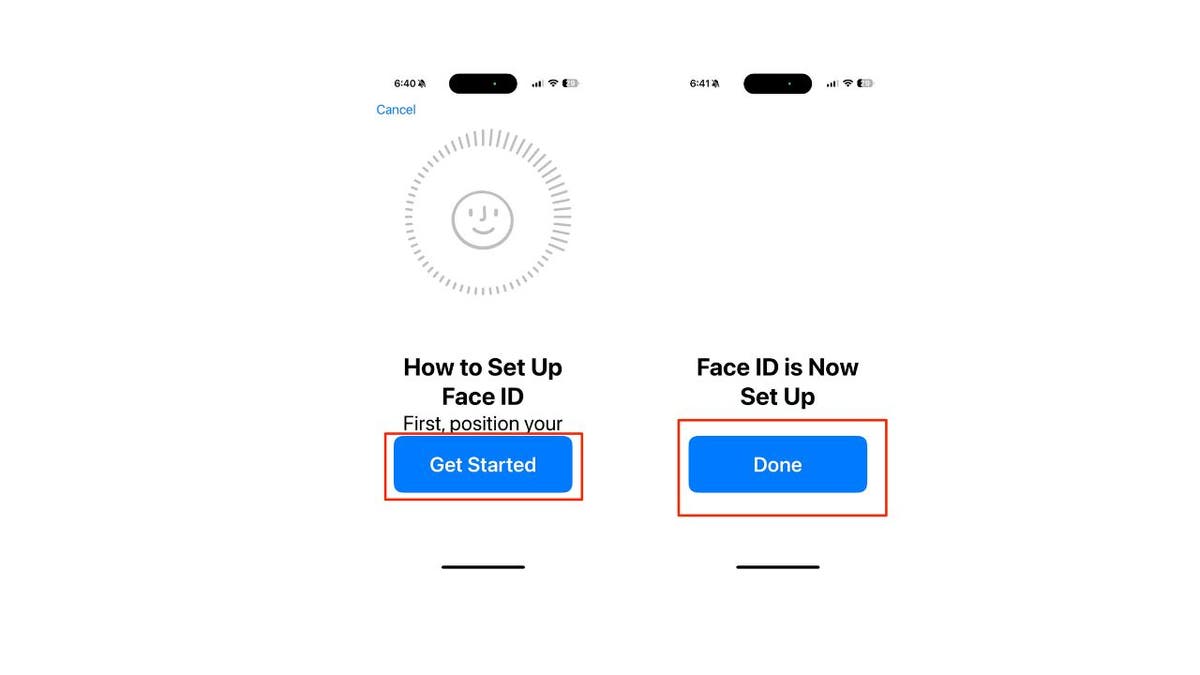
Steps to enable Face ID or Touch ID (Kurt "CyberGuy" Knutsson)
MORE: BEST ACCESSORIES FOR YOUR PHONE
Step 2: Use Find My iPhone
This feature is not just for locating your device, but also for keeping it secure if it falls into the wrong hands. Here’s how to activate ‘Find My iPhone’.
- Go to Settings
- Tap your name
- Click Find My
- Next to Find My iPhone, toggle it on.
MORE: HOW TO FIND YOUR LOST IPHONE
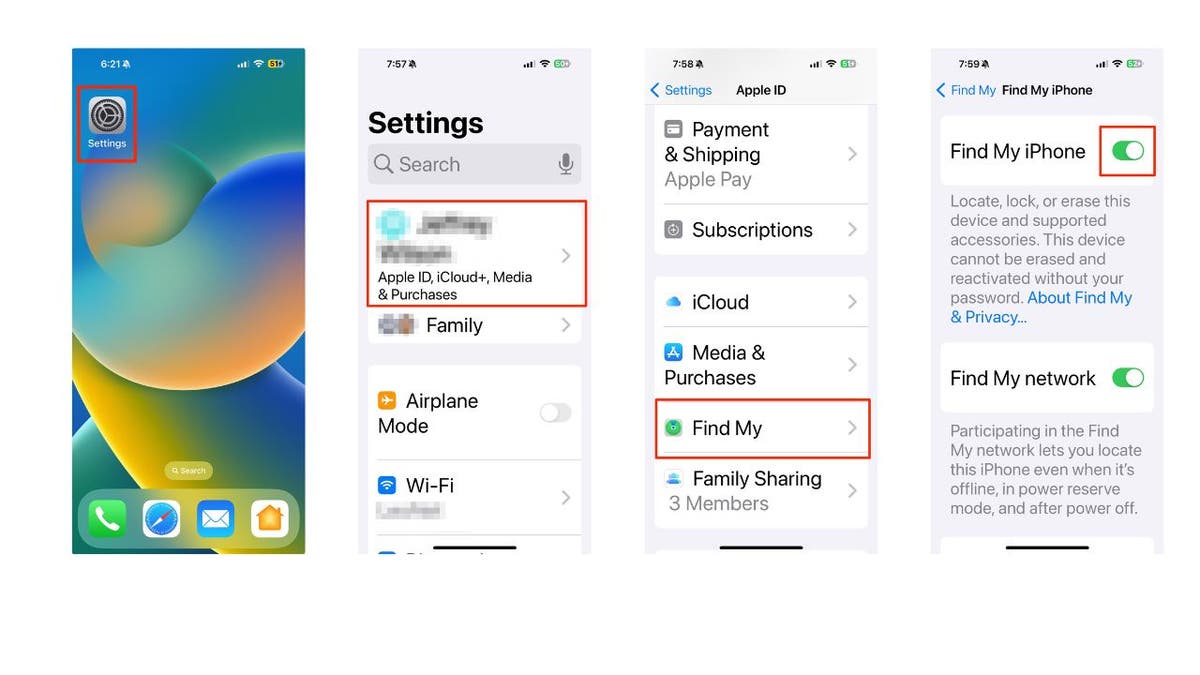
Steps to set up Find My iPhone (Kurt "CyberGuy" Knutsson)
Step 3: Hide and secure personal photos
Prevent awkward moments when someone browses your photo album. Instead of deleting personal photos temporarily, create a dedicated album for hiding them. Your iPhone offers built-in features to secure and hide photos. Here’s how to do it.
- Open your iPhone’s Photo App and find a picture you want to keep private and tap on it.
- On the top right of your phone screen, you will see three dots in a circle.
- Click on the dots and you will see an option labeled Hide. Click on it.
- Then tap Hide Photo
- Once you confirm this, the image will be hidden from your phone’s camera roll.
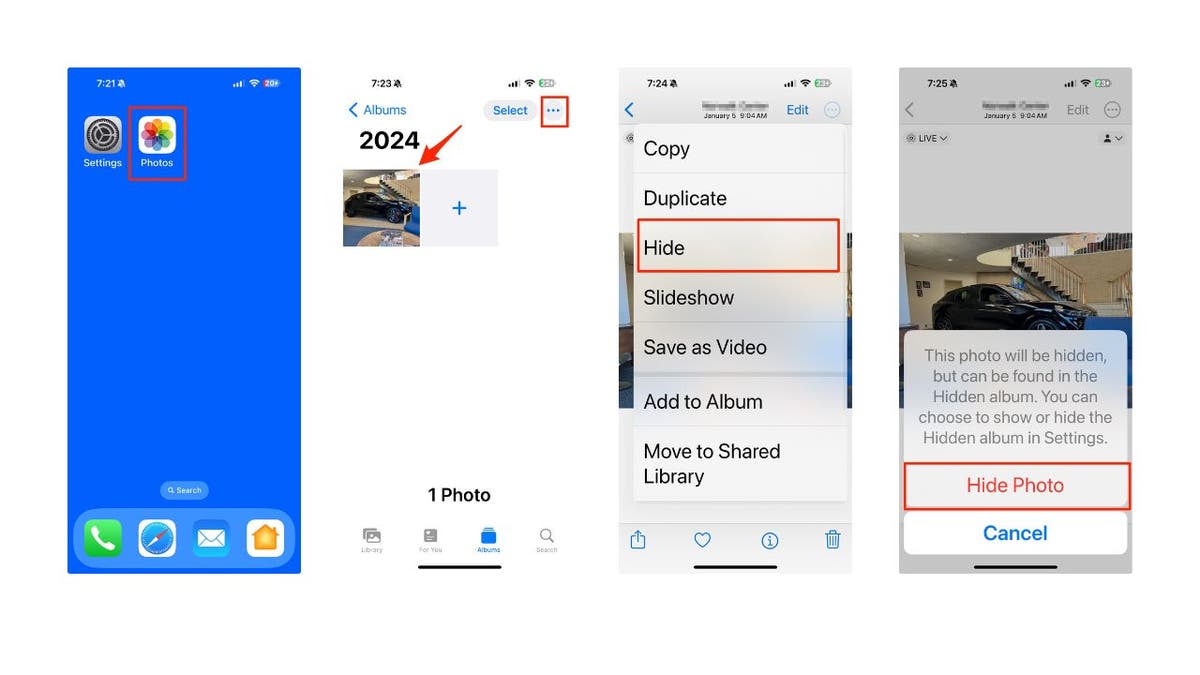
Steps to hide photos on iPhone (Kurt "CyberGuy" Knutsson)
- If you want to unhide that photo, all you need to do is return to those same three dots in a circle and select Unhide.
- If you wish to view those images that you have hidden, all you need to do is go to Albums and under Utilities and select Hidden. This will allow you to use your passcode or Face ID to view the hidden images.
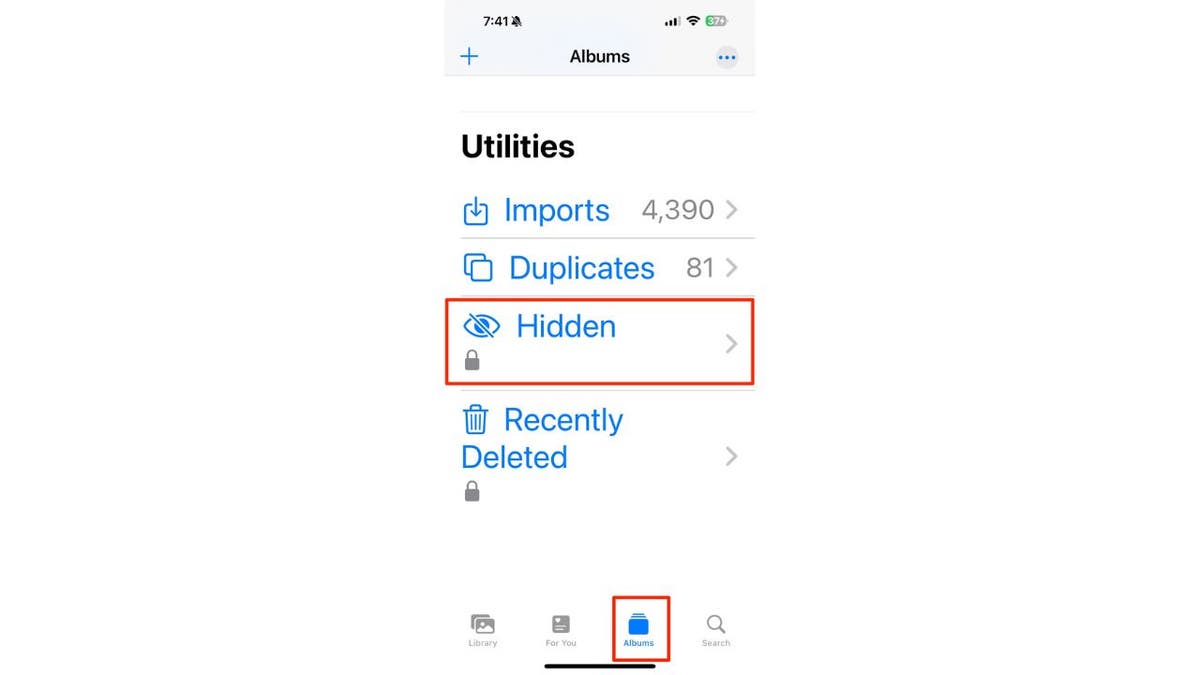
How to view Hidden photos (Kurt "CyberGuy" Knutsson)
MORE: THE IPHONE PRIVACY SETTING YOU NEED TO TURN OFF
Step 4: Use iCloud Keychain to store Passwords
iCloud Keychain simplifies your digital life by synchronizing your passwords and securing data across all your devices. It automatically fills in essential information – such as Safari and app usernames, passwords, credit card details and Wi-Fi passwords – on any device you authorize. No more manual input required.
By default, iCloud Keychain works only with Safari, but it’s also available on Google Chrome and Microsoft Edge on a Mac or Windows PC through iCloud for Windows and the iCloud Passwords extension.
Before you turn on iCloud Keychain, update your device to the latest iOS or iPadOS or the latest version of macOS and make sure that two-factor authentication is turned on for your Apple ID.
Turn on iCloud Keychain on your iPhone
- Tap Settings
- Click your name
- Then choose iCloud
- Tap Passwords and Keychain
- Turn on iCloud Keychain. You might be asked for your passcode or Apple ID password.
Find, change or delete passwords and passkeys on your Mac
Find, change or delete saved passwords and passkeys on your Mac and keep them updated across all of your devices. Here’s how to view saved passwords and passkeys in System Settings.
- Choose Apple menu in the upper left of your computer screen.
- Tap System Settings
- Click Passwords
- Sign in with Touch ID or enter your user account password.
- Select a website, then click the Show Details button (which is the “i” with a circle around it).
- To delete a password, click Delete Password.
- To update a password, click Edit, change it, then click Save.
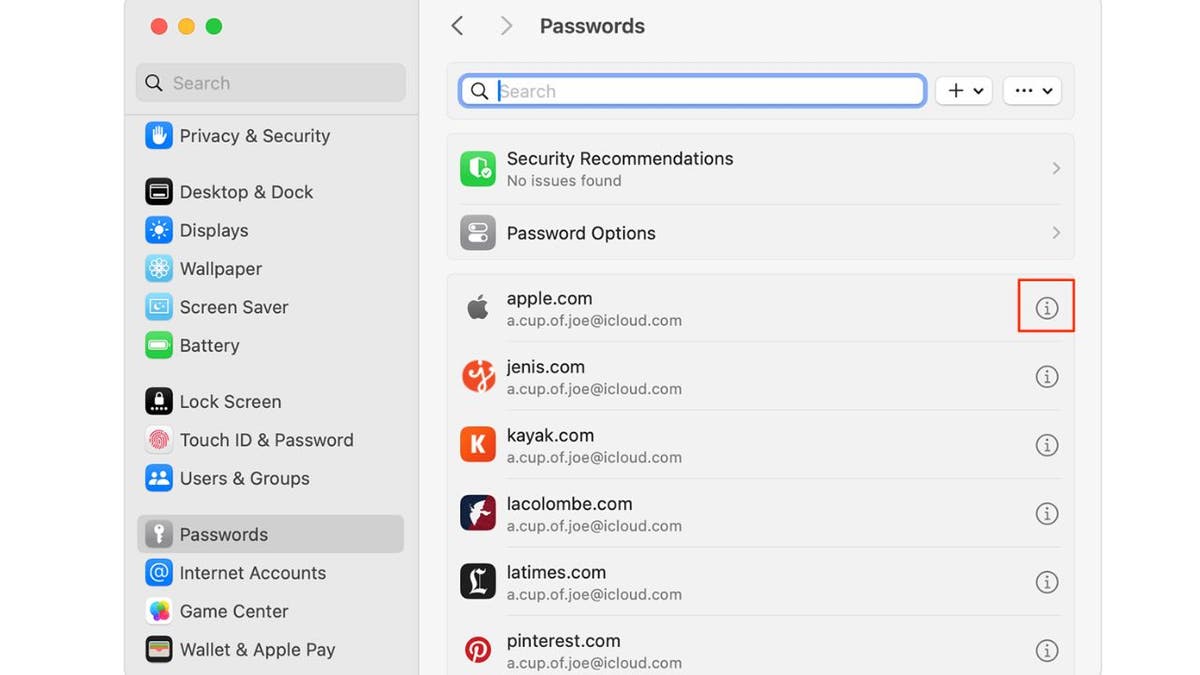
Find, change or delete passwords and passkeys on Mac (Kurt "CyberGuy" Knutsson)
MORE: BEST PORTABLE PHONE CHARGERS OF 2024
Invest in a password manager
To go beyond iCloud’s keychain for increased security, you’ll want to invest in a password manager. These are created specifically for the protection of passwords and include features for important documents and photos. This is also beneficial when sharing private data with family members.
Using 1Password as an example, you will notice that the startup screen offers storage for credit cards, identification cards, passwords and documents. We would recommend usage of the documents folder for images, and you will also see options for medical records, software licenses and even the password for your internet’s wireless router. Get more details about my best expert-reviewed Password Managers of 2024 here.

Password Manager app (Kurt "CyberGuy" Knutsson)
Step 5: Use your insurance provider’s official app to securely store your ID
Joseph also asked about storing personal information on his iPhone, like insurance cards. Well, if your insurance provider has an app that contains digital ID cards, you can usually add your card to Apple Wallet.
Start by downloading your auto or health insurance provider’s app from the App Store. Not all insurance providers support Apple Wallet. You can find out if yours does by looking for an “ID Cards” area of the app.
- On the insurance app, sign in. If you don’t have an account, you’ll usually be able to create one from the app’s login screen. You’ll probably need your policy number to do this.
- Go to the ID Cards area. The name of this area of the app varies by provider, but you’re looking for the place in the app where you’d find digital versions of the membership cards you keep in your physical wallet.
- Tap Add to Apple Wallet if available. If the card can be added, you’ll see this button somewhere on or near the cards. A preview of the digital card will appear.
- Tap Add in the top-right corner. This saves your insurance card to your Apple Wallet.
If you don’t see the option to save the card to your wallet, you can still use the digital version of your card in the provider’s app when you need to – just pull it up on the screen when asked for your insurance card.
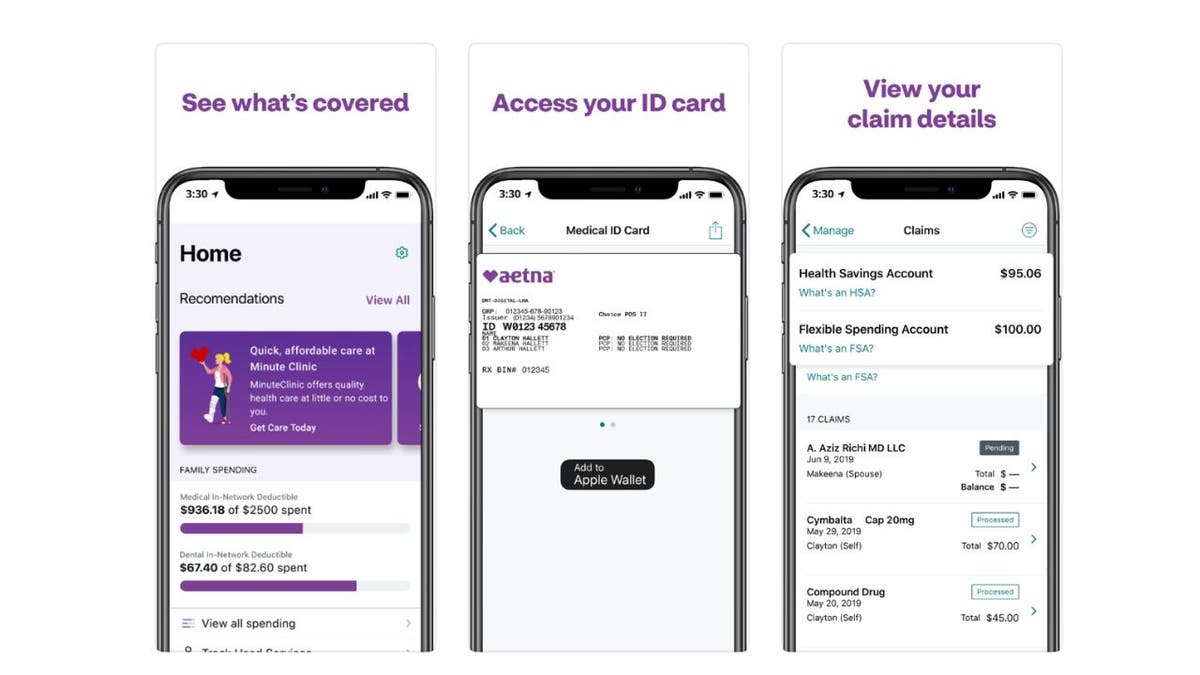
Insurance app (Aetna) (Kurt "CyberGuy" Knutsson)
Step 6: Remove apps from the home screen
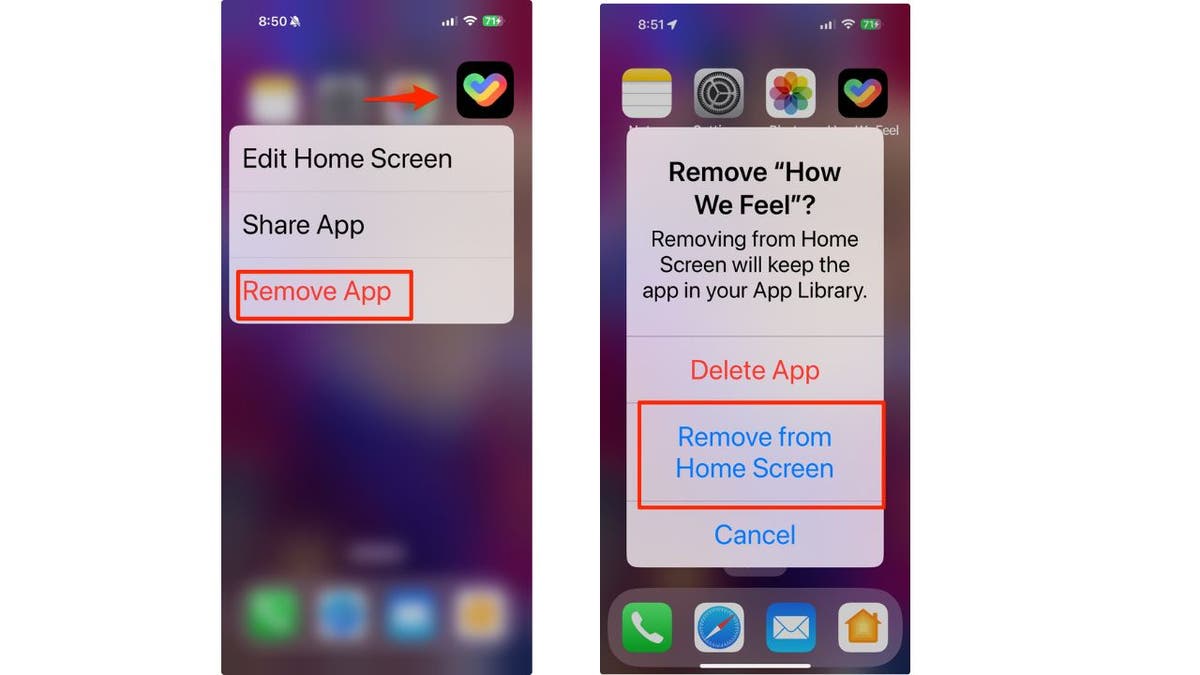
Keep your frequently used apps accessible but discreetly tucked away by removing them from your home screen. This ensures they remain private and aren’t publicly visible on your Home Screen.
- Long-press the app from your Home Screen on your iPhone
- Tap Remove App
- Choose Remove from Home Screen
- You can still find the app in the App Library.
Steps to remove app from home screen on iPhone (Kurt "CyberGuy" Knutsson)
To find the App Library on your iPhone, follow these steps
- Swipe left from your Home Screen until you reach the last page.
- You’ll see the App Library, which organizes your apps into different categories, such as Social, Entertainment and Productivity & Finance.
To open an app from the App Library
- Tap the search field at the top of the screen and enter the name of the app you’re looking for.
- Alternatively, scroll up and down to browse the alphabetical list.
- Once you find the app, simply tap it to open.
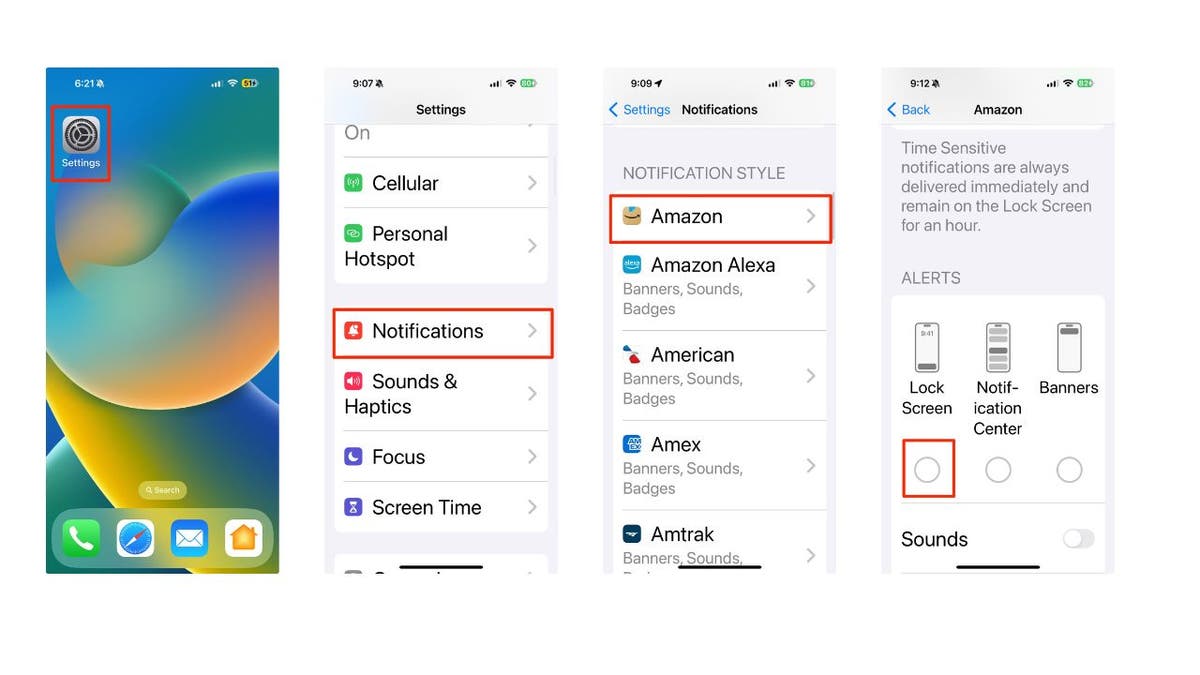
Step 7: Limit lock screen notifications
If you want to prevent sensitive information from appearing on your lock screen, you’ll want to perform these steps.
- Go to Settings
- Tap Notifications
- Select the app
- Scroll down and under ALERTS Disable Show on Lock Screen or Show Previews so that there is no check mark in the circle.
Steps to limit lock screen notifications (Kurt "CyberGuy" Knutsson)
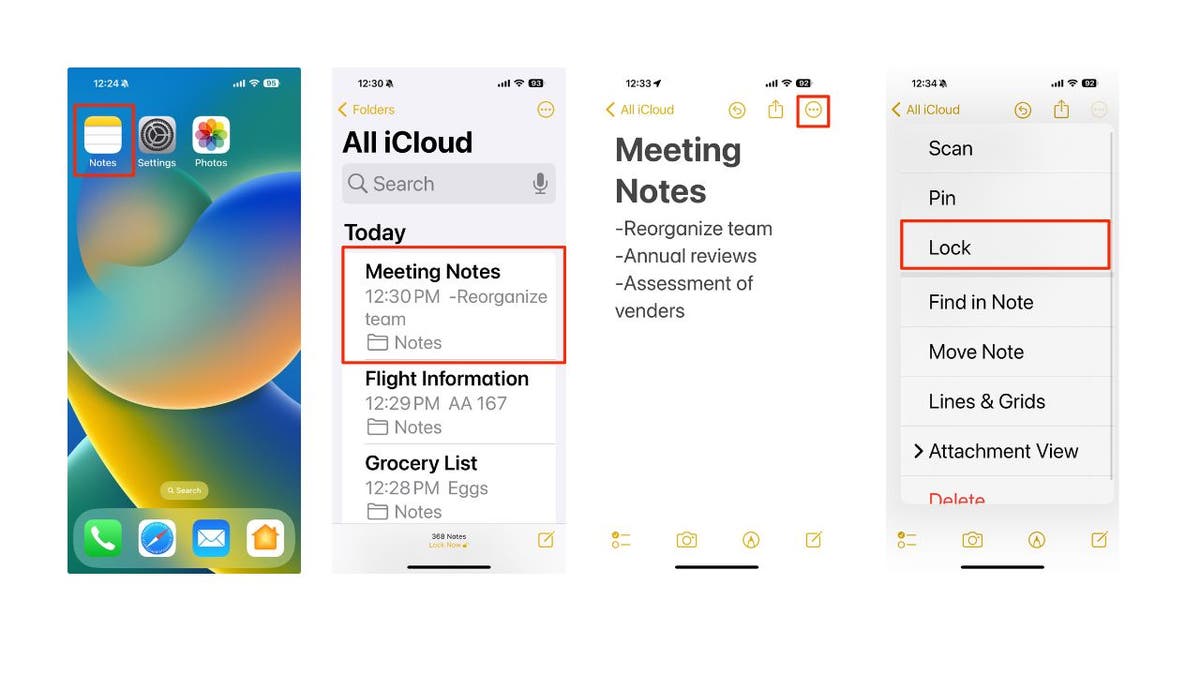
Step 8: Lock your Notes with a password
If you use the Notes app, you’ll want to protect your private notes by setting a password. Here’s how to do it.
- Tap on the Notes app
- Open a Note
- Tap the circle (with the three horizontal dots inside it) in the upper right of the note.
- Tap Lock
Steps to lock your note (Kurt "CyberGuy" Knutsson)
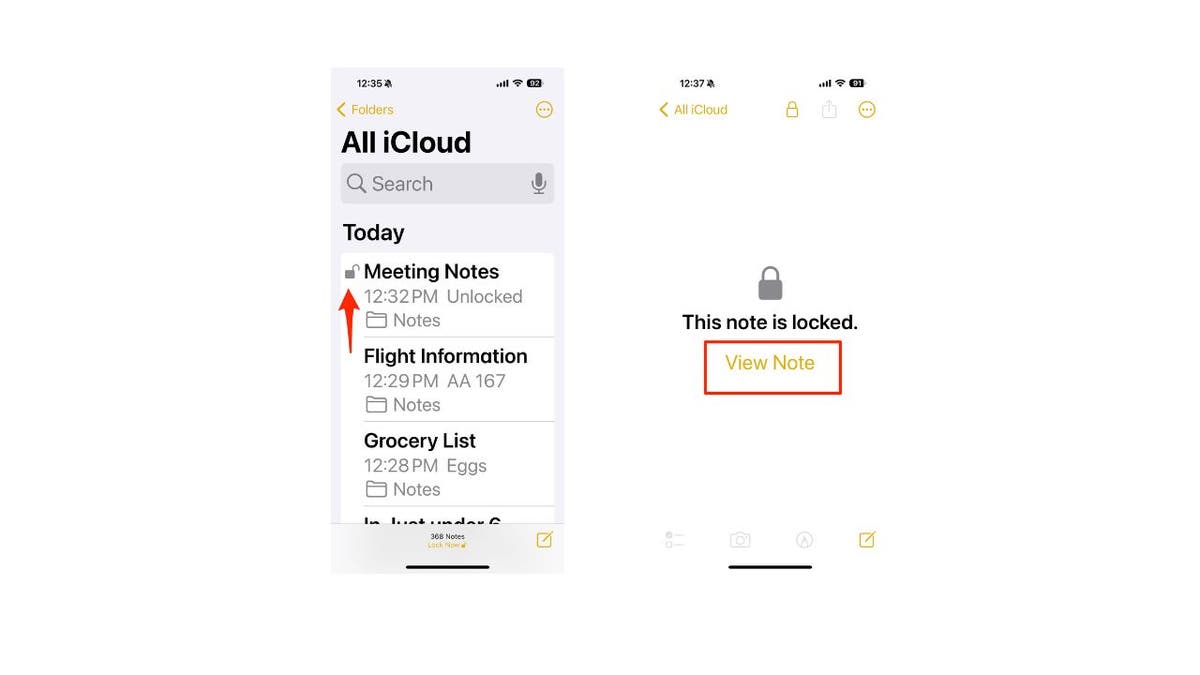
- You’ll know your note is locked because next to the note you’ll see an icon of a lock.
- When you go to view the note, a message will appear that reads, “This note is locked.”
- Tap View Note
- It will use your passcode or Face ID to open the locked note.
Steps to unlock your note (Kurt "CyberGuy" Knutsson)
Kurt’s key takeaways
With these eight steps, you’ll be well on your way to keeping your iPhone data secure. Remember, security is all about layers. Using a strong passcode, enabling Face ID, Touch ID, Find My iPhone and hiding sensitive photos are all great first steps. If you’re looking for an extra layer of protection, that’s where password managers come in. These apps securely store your passwords, documents and even credit card information. They can also be really helpful for sharing logins with family members securely. Lastly, limit lock screen notifications and lock your Notes with a password to add another barrier to anyone trying to gain access to your device.
What data do you keep on your phone that you worry most about if your phone is lost or stolen? Do you have proper backups of your data? Let us know by writing us at Cyberguy.com/Contact.
For more of my tech tips & security alerts, subscribe to my free CyberGuy Report Newsletter by heading to Cyberguy.com/Newsletter.
Ask Kurt a question or let us know what stories you’d like us to cover.
Answers to the most asked CyberGuy questions:
- What is the best way to protect your Mac, Windows, iPhone and Android devices from getting hacked?
- What is the best way to stay private, secure and anonymous while browsing the web?
- How can I get rid of robocalls with apps and data-removal services?
Copyright 2024 CyberGuy.com. All rights reserved.